Saturday, December 17, 2016

Tooth Fairy Pillow Tutorial

The hardest part of this project was deciding what size to make the pillow.  I made the tooth first and then went with what was visually pleasing to me.

Also, for the sake of finishing in one sitting I recommend making the tooth in advance.  I used white felt and black fabric paint.  It dried overnight and was ready when I was.  

My pillow finished at approximately 9.5" x 7.5".  

First cut 2 pieces of fabric 8.5" x 10". Or one piece 10" x 16" and save yourself a seam.

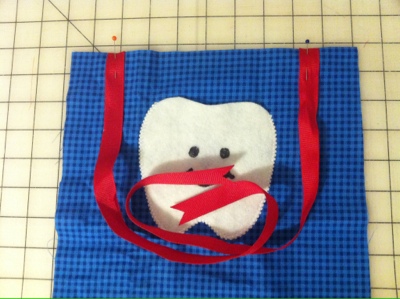
Position the tooth on the right side of one piece of fabric (or fold your larger piece of  fabric in half and with the fold on the bottom position the tooth).
Sew the tooth on three sides leaving the top open.  I used a fancy buttonhole stitch on machine just because I never had used it before and this was a nice trial.  My original plan was just a straight stitch which would have worked fine.

Cut 2 pieces of 3/4" or 1" wide grosgrain ribbon 18" long.  Position them 2" in from the upper corners.


Make sure they are inside the pillow and don't get caught in the seam when you sew the edges.  Don't ask me how I know that!!
Place the 2 pieces right sides together (or fold the bottom up to the top if you used a single larger piece of fabric) again making sure the ribbons are not in the seam line.  Pin them inside if in doubt. 
Sew around all open sides leaving an opening of 2"-3" for turning and stuffing on one end.  Clip corners and turn right side out. Press. 
Stuff lightly.  Make sure to get stuffing all the way into the corners.
Sew opening shut by hand. 
Enjoy!

I made this because a friend wanted to learn to sew on her machine and wanted to make a tooth fairy pillow.  This sample went to my nephew who absolutely loved it and wore it around his neck for most of Thanksgiving.

My friend used these basic guidelines, but made hers with the front out of a fun focus fabric and the back out of a solid.  She also skipped the ribbon and made it be just a pillow.  I love the flexibility to make it be whatever you want.

Sunday, December 11, 2016

Stash Report 12/11/16

A few small outages:


Tooth Fairy Pillow (tutorial coming soon)

Baby Jesus Felt ovals for school

And some fabric in: 

Remnants were 75% off after Thanksgiving.  There were some good greens which I need for a college quilt I will make in the Spring.  

And this cute flannel from the thrift store.  25c for 1 yard.  How could I not get it? 

At this point I think there is no way I can get out of the red for 2016.  I am working on a jean quilt that will be done by Christmas but it is commissioned and everything was provided so no help there.   

But I'm not going to get bogged down in the increase to my stash this year.  So much of the incoming fabric was free or super cheap that I am considering myself blessed with the provision of fabric. 

Fabric Used/Out This Week: 1.5 yards for various projects
Fabric Used/Out in 2016: 70.12 yards


Fabric In This Week:  1.92  yards
Fabric In 2016: 79.22 yards
 

Net Used 2016: 9.1 yards stashed

Staying accountable with Judy over at Patchwork Times.

Friday, December 9, 2016

Bravo's Vests

One of my co-workers is a Puppy Trainer for K9s for Warriors.  This year her service dog-in-training is Bravo.  Bravo is a golden retriever and comes to school three days a week.

We got a head start on getting little Bravos ready for the students to take home when I found golden retriever Webkins at the Dollar Tree.

Since I knew from experience with Valor what worked I got these done lickety split.

Pressure from a student leaving in December and having to have his Bravo ready helped a lot too!


Way to go, Bravo!  You are going to make a great service dog!

Showing off finishes with Crazy Mom Quilts and Confessions of a Fabric Addict.

Wednesday, December 7, 2016

Dear Jane Qualifies for Regionals

Woo hoo.  Middle E qualified for Regionals with the Medley Relay and the 100 Butterfly.  Regionals was 4.5 hours away - one way.  Plus the usual sitting and waiting.

I was running out of blocks that were just applique except for a few that were way too complicated for me at this time and certainly not for this kind of setting.  I was the passenger going over in the morning so I got a lot done on the road and then more while sitting.  I took my shift driving coming home in the dark, so that maximized my sewing time.  I actually ran out of prepped blocks.


H 12  The easiest of the batch.  I'm very pleased.


D 8  I really tried hard to get my symmetry and uniformity right on this one.  I'm satisfied.


B 3  Another easy block.  I had thought a lot about how to do this.  It did require more prepping, but that made it easier.  I just made 2 identical 4-patches.  I cut a circle from one and rotated it over the other and appliqued it down.  Perfect.


 G 11  I figured out that sewing the 9-patch first and then adding the applique made it easier to get the diamonds in the right spot.  I'm not thrilled with the shape of my diamonds, but done is good.


I also worked on I 11 but my prep was rushed and not great and the 4 sections were not uniform when I tried to finish up the machine sewing at home.  Didn't even take a photo it was so bad.  I think I can redo just one quadrant and then I'll be okay.  Later.


 Don't miss the next installation -  Dear Jane Goes All the Way to States!!

Monday, December 5, 2016

Jean Quilt Progress

This commissioned project is moving right along.  Thankfully I have spurts of time, because the heavy duty aspect of dealing with the jeans makes it tiring and perfect for little spurts.

Deconstructing and cutting took over 30 minutes per pair of jeans.  Kind of surprising.  Glad I had the stopwatch going.  I got 16 8" squares from each pair of jeans and 4 8" squares from each pair of shorts. After I took out the squares that were stained or had a hole per the client's wishes, I had 96 squares to work with.

An 8 x 12 layout.  Just a tad under what I had hoped for.

I knew I would have a good chunk of time on Sunday afternoon, so I made sure to be ready to lay it all out and web it together.  It was surprising how many of the denims were so close in color.  But I think I got the colors and pockets "randomized" pretty well.  It is very heavy as I suspected it would be.

The client wants batting, but it will be very thin.  She also recently saw a denim that is lightweight that she would like for backing instead of the solid blue cotton that had been her first choice. She says it isn't chambray, but looks like denim.  I think I'm going to have to go to the fabric store and ask a lot of questions.

Does anyone know anything about a lightweight denim???

Check out Patchwork Times to see what others are working on.

Sunday, December 4, 2016

Sometimes It's Good to Forget

I started this quilt over a year ago for my nephew-to-be.  Then I found out there was specific theme.  I aim to please so I set this aside and started over on a bear's paw quilt with woodland animal themed fabric.
Spring 2015

So this top has been languishing waiting for just the right baby.  Well, it's time has come and now I need to finish it up.

Since we are headed in to the home stretch of stash reporting for 2016 I am looking for any finish I can to help me out.  It turns out that even though I finished this quilt top I never reported the fabric out.  That certainly works in my favor.
Fall 2016

The pattern for this quilt can be found over at Jo's Country Junction.  It is a smaller version of Unchained Melody.  Their directions are super clear and this was a fast quilt to make even though quite a few of my fabrics were directional.  I adapted the outer rows for the smaller size quilt.  I would definitely make this pattern again.


Fabric Used/Out This Week: 5.72 yards top, backing and binding
Fabric Used/Out in 2016: 68.62 yards


Fabric In This Week:  0  yards
Fabric In 2016: 77.3 yards
 

Net Used 2016: 8.68 yards stashed 

At least I'm out of the double digits!

Linking up to Patchwork Times to stay accountable.


Friday, December 2, 2016

Transportation Quilt Finished

Th Transportation Quilt was a surprise finish.

I had made the top last year, but then found out that it was not the "right theme" for the baby.  So I set it aside.  When my sister decided she wanted a coordinating quilt for the Happy Quilt I knew just what to do - finish the transportation quilt.

I had originally thought a red backing, but it just didn't seem right.  So I made a color block backing of red and blues and I like it a lot better.  The blue binding is perfect for framing it all up.

So a surprise finish, a quick finish and a finished finish!!
Coordinating, some fabric is the same, but not still unique.
Flapping in the breeze just because I like it.

Linking up to Crazy Mom Quilts and Confessions of a Fabric Addict to show off finishes.