Friday, January 31, 2014

It's Friday and I Finally Finished ...

Not the whole quilt, but at least the stars.  The stars went very quickly once I started.  I don't think they would have gone this quickly way back when I picked this pattern and started that one block.  I have learned a lot since then and I think my quilts are coming together faster and more accurately.  If there was a turning point I would have to say it was following following Bonnie Hunter's Quiltville blog and then attending the Bonnie Hunter Smith Mountain Morning class.  I started to really put into practice what I had read and seen and it all clicked.

So after just 2 weeks I have gone from here to finishing the 32 stars.  Amazing productivity for me.  Now to start on the blue alternating blocks.  But I really need to quilt the pink & purple baby quilt.  It is headed to Guatemala for a future niece and I have to get it done in time to get there.

See some other finishes at Confessions of a Fabric Addict
and Crazy Mom Quilts


Wednesday, January 29, 2014

Humbug Bag Tutorial

My first attempt at a tutorial. We'll see how it goes.

Last year - or the year before? - there was a brief showing of "humbug" bags at my quilt guild. I thought they had potential since I have girls and nieces. Held onto the idea and pulled it from the deep recesses of my brain in time for Middle E's quinceanos party. Seemed like the perfect take home for a bunch of 14- and 15-year-olds.

For several months we picked up fabrics we liked as we saw them. The basic idea was to make a different one for each girl but all having turquoise and lime green in common.  Unfortunately, I neglected to take pictures of the finished bags.  The girls sure did ooh and aah when they were unveiled!!

 
I worked from memory of what it looked liked and logically how I thought it should go together.  There might be other better tutorials out there but this one works for me.

Supplies: 11" square of fabric; 11" square of coordinating lining; 11" square of thin batting; 9" coordinating zipper; 2 - 3"x2.5" pieces of accent fabric; 12" of 1" wide grosgrain ribbon; 2" of 1/4" grosgrain ribbon; small utility clip.  (Note: I went as small as a 9" square and 7" zipper depending on what I had.  This is a very forgiving design.)

Fold each small rectangle in half matching the 2.5" sides and sew.
Turn right side out leaving about 1/2" tucked inside.

Fit top end of zipper into the tube created from the accent rectangle with the folded
edge towards the zipper.

Center the seam in the back. Sew close to the edge.

Repeat at lower end of zipper pulling accent tube over the zipper stop so it does not show. Trim excess zipper from inside the accent pieces. (This is where you could use a shorter zipper and longer accent tabs or a longer zipper and no tabs.) Accent tabs will be slightly wider than zipper. No problem since it will get trimmed later. 


Place zipper face down on the 11" square of fabric centering it 
and lining up the edge of the zipper with the edge of the fabric. 
    Position lining over zipper. Pin in place.
You can see that I pieced my lining.  Fabric was perfect, but not the right shape.

 Using a zipper foot sew. Contrary to appearances I did not sew over the pin.

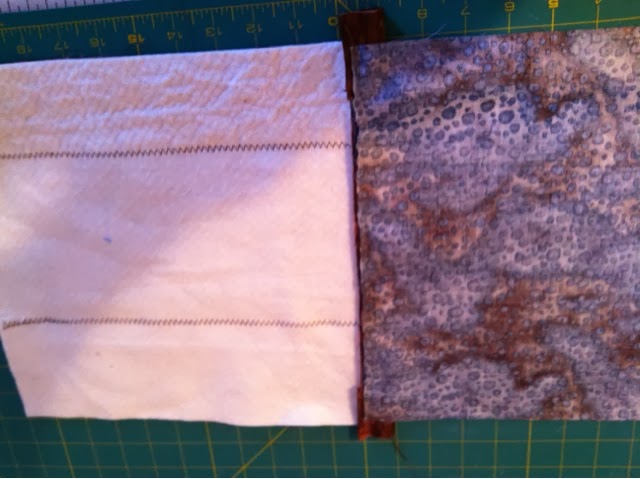
With right sides down and fabric and lining opened up, position batting on lining side.


 Fold front fabric over batting. Smooth for a good smooth fit and pin in place.

Machine quilt as desired. 
I marked a diagonal line from corner to corner with chalk then sewed on the line.

Using this handy dandy attachment I then sewed straight lines on both sides of my first line.  
To the left of the center line I used the attachment in the proper position.  
To the right of the line I attached it upside down and backwards (as shown).  

Square up the entire piece. 
This is where the forgiveness in measurements comes into play.  
I lost less than 1/4" on only 2 sides.


With right sides together match the zipper side to the opposing side.
Center and pin. Sew with a zipper foot. 

With it still inside out and with the zipper still to one side, line up the lower edges and pin.
Start sewing at the zipper end.  Oops! I pinned it backwards.

It will look like a normal rectangular bag at this point.
Reach in and pull down the zipper down at least half way (or you'll be stuck later -
wonder how I know that!!). 

The bag is still inside out. 
Now, at the top, center the zipper with the back. Pin.


Fold the 12" piece of ribbon in half wrong sides together. 
Insert ribbon into bag right in the center with raw edges sticking out between the zipper and the back. You might have to repin.

Fold the 2" ribbon the same way and position it right next to the wide ribbon.
It is harder to manipulate, so allow about 1/2" of the small ribbon to be "lost" in the seam allowance.
You only need enough left inside to attach the utility clip to and less is better so it isn't floppy.

Sew across the top making sure to catch all the ribbons and zipper accent tabs. 
Resew  for reinforcement.  Clip all corners.

 Reach in where you left it unzipped and pull out your super cute Humbug Bag.
Attach the utility clip.  This was something we added to the idea. 
Seemed to give it more character and make it more versatile.


Middle E's PVHS Shark Humbug Bag!!


For the party bags I made contrasting yo-yo and button flower decorations and attached 1, 2 or 3 (depending on the size and number of yo-yo layers) to the upper portion of the bags.  
Turned out super cute with those fun fabrics. Kicking myself for no photos.

Note to self:  Learn how to manipulate photos so they end up where and how I want them to.

Monday, January 27, 2014

Design Wall Monday 012714

I am continuing with the red, white and blue quilt.  It's start can be seen here.

These stars are addictive.  I cut pieces out of most of the reds I had tucked away with this UFO.  Plus some of my mother's reds.  Same with the whites.  I did a few trial blocks to find which way works best for me to do the flying geese units, since I have not made any of them in a long time.  Now that I have it down to a system I am sewing 2 blocks together at a time.  They "lead & end" each other.  Then between every 2 blocks I get in the real leader & ender project - 2" squares for Dancing Nine Patch by Bonnie Hunter.

I really like the scrappy star points.  If I ever did this again I would do something more interesting in the block center.  But since it is a UFO and I am following the pattern - more or less - I will stick with the solid center for now.  That 5" square just looks like a blank canvas waiting to be played upon!  Next time.  I am definitely a much more scrappy quilter than when I started this 4 years ago.

The quinceanos quilt that is covering the design wall waiting for more signature blocks to come in is slowly being covered.  I like these red stars so much I don't want to just stack them up.  I don't have much wall space and the room has been added to and rearranged since I put up the design wall and now I can't really reach it.  So figuring that out seems like it should be a project too.

The pattern calls for 32 red stars.  I have 20 done - including the non-scrappy original block.  I had thought maybe I would unsew it and make it scrappy, but now I just think it will get included as is.

Go see some other Design Walls at Patchwork Times.

Sunday, January 26, 2014

What's on Your Bed?

Jo threw out this question and since I had just remade 2 of the beds I knew exactly what was on the beds.  We are trying to get back to normal from Middle E having the flu and being quarantined upstairs and Little S sleeping on the couch/with us downstairs.

The quilts are mixed up since there is a huge batch waiting to be washed.  Even with the super cold weather we are having now there should still be enough layers to keep us warm.  It feels like the heat is not keeping up, which makes me very thankful we are in north Florida and not in north anywhere else.

Middle E has the quilt my MIL made for Little S at least 4 years ago.  No label.  I should know better.

She did not want to get out of bed, but didn't want to be in the picture. So it is 3/4s of a quilt!
Little S has the high heel quilt my mother made for Middle E about 4 years ago.  She embroidered E's name on several of the high heels.  I will have to look closely and see if there is a date as well.

I have the Smith Mountain Morning quilt that was mentioned here.  It is staying on my bed forever!

Head on over to Jo's Country Junction to see what's on some other beds!


Stash Report 012814

Not much change. I sewed lots of red stars but didn't finish an entire step in that project so according to my own rules I can't count the fabric as used yet.

I did finish a mending/remake project for my sister. She had a Christmas apron that had been made from a tablecloth it appears. Idea was good but execution not so good - didn't fit right so she did not use it. 

I used an apron that she does like as a pattern and recut the Christmas one. I added fabric from my stash for the new binding/ties. The extra fabric that was cut off the sides was added as the tie ends!  No waste and a tiny bit of fabric used!!

Fabric Used This Week: 0.2 yards from stash for apron strings


Fabric Bought This Week: 0 yards


Total Used 2014:  7.4 yards
Check out some other stash reports at  Patchwork Times.

Saturday, January 25, 2014

Apple Jelly

Apples were on sale, so I made jelly.

Two years ago I was consistent and made jelly and jam whenever fruit hit its lowest price.  Then I gave it away as teacher gifts, family gifts, thank yous, etc.  My stash ran out and I was not able to make more last year.  This year I am trying again.
6 half pints of apple jelly.

I don't "work outside the home" on Fridays, so it was time to finish this apple jelly project that had started last Monday.  Sick and busy had kind of taken oven the week and I am trying to make order of things again.  What I really want to do is sew more red stars for this project. But I am using a little bit of will power and prioritizing tasks.  Clearing off kitchen counters was #1 yesterday.

Whenever I make jelly I am always amazed at how easy it really is.
 

Friday, January 24, 2014

It's Friday and I Finally Have a Fast Finish

Test Quilt /PVPV Carnival quilt.

An acquaintance came to me with a problem last week. Her 3rd grade daughter volunteered her to make the class quilt to be auctioned at the Spring Carnival. She knows how to sew, but had no idea how to put a quilt together.  I figured I could make it faster than explain how to do it. 

She gave me the bag the teacher had sent home. Contents:  18 6" squares roughly cut by scissors already decorated, less than 1.75 yards of green fabric and a package of "wrap-n-zap" for batting. Hmmm ???  This was going to be a small boring quilt no one would bid on. 

Since Little S attends the same school and will also benefit from the proceeds of the carnival I decided to put some effort and creativity into it.  

First step - square up the kids' squares and find out what size I was really dealing with - 5 3/4".  Then cut 18 more squares of solids in primary colors. Red, orange, yellow, blue and purple from my stash. Green from the teacher, hoping there will still be enough for borders and backing.  Little S got it all nicely arranged. I sewed it together using Bonnie Hunter's web technique very quickly. 

Inner border. The stripe from my stash worked well - framed up the center section without distracting from the kids' blocks. 

Outer border was a little trickier although it doesn't look like it now that it is finished. I really, really did not want to piece the back. Some quick math and I cut off a bit more of the precious green for borders leaving the bare minimum for a backing.  I knew it would be close, but I was hoping to have enough green for the entire outer border and not need to add cornerstones to make up the difference.  Success with 2" to spare. Saved me a lot of extra work. 

The "wrap-n-zap" batting that was provided was too small and I'm not sure it was even intended for quilts, so I turned some batting scraps into Frankenbatting and that worked fine. 

I had a variegated thread in bright primary colors that I had picked up on sale and figured I would eventually use on a kid quilt. It was perfect. The colors show up great on every color in the quilt. Loops all over went quickly. I quilted just around the edges of the kids' blocks so as not to distract from their drawings. Put on a binding and it was done!  

I called this a test quilt because I kept careful track of all the measurements and the time it took me to do each step.  In the last weeks I have been asked twice about making quilts. I have made quilts in the past on commission but afterwards thought it really was not worth it. So I did some research on how to price a quilt and by tracking time and measurements I now have a little bit of a baseline to work with. It was also a test for me see how much I could accomplish when I worked steadily with no distractions. Doesn't usually happen that way but just this once it was nice.  Finished size 44" x 44".  Total time - 5 hours.  Wow!

I am pleased with how the quilt turned out. I think it is child friendly and ended up a nice snuggle size!

Check out some other finishes at Confessions of a Fabric Addict and Crazy Mom Quilts.

Monday, January 20, 2014

Design Wall Monday

Red, White & Blue UFO

Original on left.  Scrappy idea on right.
This one has been languishing in my mind for a long time.  Since we lived overseas for so long I always wanted to make a RWB quilt, but never found a design I liked.  Finally, not long before we moved back to the US I found it.  From the looks of things I made one block, saved about an 8" strip of a few reds and put it in a bag.  The bag of course got moved - and stored.

Middle E turned 15 last November and I am working on a quinceanos quilt for her.  Another story for another post.  But in doing that I needed some good RWB fabrics.  I knew I had some set aside and being a good packrat, I found the bag right away and used some of the reds.  Perfect.  The bag is, of course, still sitting on my work table.

This weekend I had a fast finish which I'll post about later this week and got the backing done for the pink baby quilt which can be seen here.  A finish and a near finish in one month is just unheard of for me.  Either I have more time than I used to, which would be great.  Or having this new blog is motivating me to get things done in order to post about them.  I'll take either.  Anyways, those finishes led to me clean off the work table and there was the bag for the RWB project.

I pulled it out and figured why not. The instructions were not there, but I remembered which book it came from and I still had it - pretty amazing considering we gave away probably 90% of our belongings when we moved to the US.  See, a packrat really does have a plan!  I knew that I would get to it some day.

The red centers are all cut and also strips for the red triangles.


I have become more scrappy since I made this one block.  I want to make the points of the star different than the center and maybe different than each other.  I like it much better so far.


A very touching thing happened when I was cutting the centers.  I did not have enough different reds and thought I remembered another bag of RWB.  Wanted to make sure before I started cutting doubles.  Dug around a bit and sure enough.  Turns out it was my mother's RWB stash bag.  She had some good reds in there, but the awww moment was this block.

She had obviously been working on the very same block and playing with the bonus triangles.  Even though hers is larger, I will definitely work it in somehow along with plenty of her reds. And it just felt like confirmation that this is the right project for now.


Stop by Patchwork Times and see what's on some other walls.

Sunday, January 19, 2014

Stash report 011914

I got the backing made for the pink/purple baby quilt.  All 10.5" squares from stash.  Had 2 good finishes on Saturday that used more.  I will write about them later this week.

Fabric Used This Week: 3.7 yards in these projects: 
2.6 yds pink backing
0.9 yds for PVPV Carnival quilt
0.2 yds for humbug bag. 

Fabric bought This Week: 0 yards

Total Used 2014:  7.2 yards

Note: For the carnival quilt I was given some fabric but since it was all used in the quilt and I will give the quilt back this week I did not count it as in or out.  

I am feeling very pleased with myself. Keeping track really lets me see progress. It also makes me want to have finishes to report.  Starting a blog has benefits I never imagined.

Go see how others are stash busting at  P atchwork Times.

Thursday, January 16, 2014

Quilts from 2013

The College Quilt

The cobbler's children go barefoot and this quilter's daughter went off to college in 2012 without  a special quilt.

I had colors in mind to match her new college sheets, but life just got too complicated and it got put even farther back than the back burner.   Then I thought I would try again for her birthday in February 2013.  There had been a demonstration at my quilt guild meeting about how to make a "Lasagna Quilt."  Sew 2.5" strips end to end and then sew them side by side.  Some groups do this as a race.  Hmm.  Speedy had a certain appeal, but other than that I didn't love the quilt.

The more I thought about this lasagna quilt, the more I thought it might just work after all.  R is very creative and artsy.  She does a lot of things with manipulating color using unusual mediums.  So I thought - what if I manipulate the colors on a lasagna quilt.  Instead of sewing the strips side by side as the layers build up, my plan was to sew a continuous strip back and forth on itself starting at one end and letting the colors wax and wane as it proceeded from the color at one end of my strip to the other.


So from my stash I cut 2.5" strips from all the colors ranging between green, blue and purple and laid them out in ascending and descending order until I thought I had it right.  Now in the photo I can see some spots where it isn't quite right, but I'm okay with that.   There was only one gap that I had to actually purchase a tiny bit of fabric for.  I didn't think it would make a difference, but I can see how it connected the fabrics on either side much more smoothly.

I failed to do the math ahead of time and my strip was too long.  Better than too short.  So I shortened some of the longer strips.  Then I cut about 10 widths at a time and pieced them back and forth so that the colors followed their order.  I didn't want to cut too many at a time or I would have gotten them mixed up.  

Once I got the top together I used all the larger leftovers for the back.  I had so many little triangles left from sewing the strips together diagonally that I had to include them.  Unfortunately they were all paired up in colors that were too close together to get a good pattern going.  So I threw them all together in a basket and them picked out contrasting pairs and sewed them back together.  Because of those little HST I almost like the back better then the front.

I had it all ready to go and really, really thought I would have it quilted and ready for her birthday.  But life took a turn for the worse and I just couldn't work on it during that time.  Eight months later I was ready to try again and everything went just fine.  I used it as an opportunity to try different FMQ designs.  I am not very adventurous with my quilting.  A stipple or loops is about all I ever do.  But I made a conscious effort to try something different in almost every strip.  I also included writing - encouraging Bible verses - about every 5th strip.  I thought I would just work away at it slowly and get it done for her next birthday, but several days before Christmas when the girls were out most of the day I settled in and just did it.  I almost had to pinch myself when I got to the end and it was DONE!  The binding had been set aside ages ago, so I quickly got it cut, pieced and sewn on.  I sewed in down by machine figuring it might get some rough use. 

Even though she knew I was working on it, she did not realize I had finished it, so it was a nice surprise for Christmas.  But since her bag was already too full for the flight, it will get sent to her for her birthday after all.

This was a good experimental quilt - colors, piecing and quilting.  I still don't love this style of quilt, but it worked how I wanted it to and my daughter likes it.  As far as quilting, I think I have broadened my repertoire of FMQ designs.  All in all - a success. 

Monday, January 13, 2014

Design Wall Monday 011314

The pink/purple baby quilt top is finished - you can see it here.  I have some misc pink flowery fabrics from the deep stash that will never see the light of day anytime soon cut into 10.5 inch squares to piece into a nice girly backing.  Just have to get an arrangement worked out for them.

Little S wants to submit a quilt for QuiltFest in Sept 2014.  She knows how to sew, but has to work on her seam allowance.  I had some 8" squares precut for another project that didn't happen, so it was perfect to pull out one day during the vacation when she decided she wanted to sew.  She got one seam done and quit.  But yesterday she just sat down and started sewing away until she had it all done.  I pinned and she sewed.  When I got ahead of her then I cut out the pink flowery squares and I was still close by to supervise.  Two birds with one stone!

She got 4 big 9-patches done.  Make a nine-patch was one of her new year's resolutions so she was super happy.  Then to liven it up a bit, we cut them for a disappearing 9-patch.  So more sewing in the future to get those sewn together to make the top.  There was just enough extra fabric to make a few more pieces so the "sashing" will be the same on all four sides.  This is destined to be a donation quilt through the quilt guild. 
Disappearing 9 Patch blocks on the design floor.
See other design walls at Patchwork Times.